The steps necessary to create a Windows Service that accesses Oracle Database via ODP.NET and uses the "NT AUTHORITY\LOCAL SERVICE" low-privileged operating system account are not substantially different from the steps necessary to create a service that does not access Oracle Database. As such, the steps below are substantially similar to the steps in the "Walkthrough: Creating a Windows Service Application in the Component Designer" topic available in the Visual Studio Programmer's Guide for the .NET Framework. You may wish to review this walkthrough in addition to the steps I provide below.
My goal is to provide the steps necessary to create a (very) simplistic Windows Service that uses the "NT AUTHORITY\LOCAL SERVICE" account to "talk" to Oracle Database. This is by no means an all-encompassing treatment of the topic of using a Windows Service in conjunction with ODP.NET, etc. However, it should provide the minimum amount of information to get started down this path.
So, without further ado, let's get started...
The Setup
Because this solution needs an installer, I am not using an Express Edition of Visual Studio. I'm using Visual Studio 2005 with ODP.NET 11.1.6.20 on a Windows XP Professional machine. This machine will also serve as the deployment target for the installer and is hosting an Oracle 11g Release 1 database.
Create the Visual Studio Project
1. Select File -> New -> Project... from the main menu.
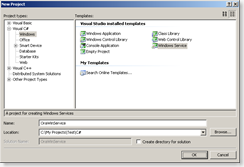
2. In the New Project dialog expand the Visual C# node under Project types, click the Windows option, select Windows Service in the Templates list, enter OraWinService as the Name, and select an appropriate location (or simply accept the suggested location). The New Project dialog should resemble the following:
3. Click OK to create the project.
Add a Reference to the ODP.NET Assembly
1. Select Project -> Add Reference... from the main menu.
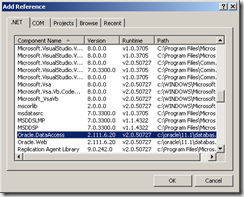
2. In the Add Reference dialog, scroll down and select Oracle.DataAccess under the Component Name. The dialog should look similar to the following:
3. Click OK to add the reference.
Set the Service Properties
1. The Service1.cs file should be displayed in the design view. If it is not, right-click the Service1.cs file in the Solution Explorer and select View Designer.
2. Ensure the Service1.cs file is selected in the designer by clicking anywhere on the surface except for on the hyperlinks.
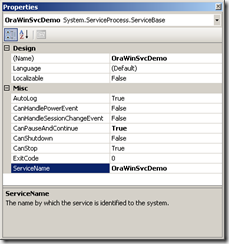
3. In the Properties window for Service1.cs, enter OraWinSvcDemo for the (Name) property. Also enter OraWinSvcDemo for the ServiceName property. Set the CanPauseAndContinue property to True. The AutoLog property should also be set to True, which is the default. When complete, the Properties window should resemble:
Edit the Main Method
1. Double-click the Program.cs file in the Solution Explorer to open it in the editor.
2. Replace the auto-created Main method with the following code:
static void Main() {
System.ServiceProcess.ServiceBase[] ServicesToRun;
ServicesToRun = new System.ServiceProcess.ServiceBase[] { new OraWinSvcDemo() };
System.ServiceProcess.ServiceBase.Run(ServicesToRun);
}
3. Select File -> Save All from the main menu and then select File -> Close from the main menu to close the Program.cs file.
Add an EventLog Component
1. With the Service1.cs file displayed in the design view, expand the Components node in the Toolbox and drag and drop an EventLog component onto the design surface. This will create an instance of the EventLog component named eventLog1.
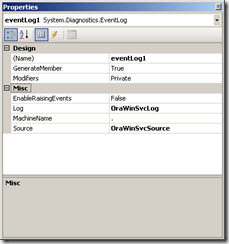
2. If eventLog1 is not selected, left-click it to select. In the Properties window enter OraWinSvcLog for the Log property and enter OraWinSvcSource for the Source property. The Properties window should now look as follows:
Define the Service Methods
1. Right-click the Service1.cs file in the Solution Explorer and select View Code from the context menu to open the file in the editor.
2. Add the following three lines to the end of the "list of using statements". A timer will be used to periodically trigger an event to write information to the Event Log. The other two lines are boilerplate inclusions for the ODP.NET namespaces.
using System.Timers;
using Oracle.DataAccess.Client;
using Oracle.DataAccess.Types;
3. At the top of the class definition (but outside of any method definitions) add the following (be sure to adjust the Data Source in the connection string as appropriate for your environment). The user will be created later:
string constr = "User Id=/; Data Source=orademo; Enlist=false";
OracleConnection con = null;
Timer timer1 = null;
At this time the entire Service1.cs file should contain the following:
using System;
using System.Collections.Generic;
using System.ComponentModel;
using System.Data;
using System.Diagnostics;
using System.ServiceProcess;
using System.Text;
using System.Timers;
using Oracle.DataAccess.Client;
using Oracle.DataAccess.Types;
namespace OraWinService {
public partial class OraWinSvcDemo : ServiceBase {
string constr = "User Id=/; Data Source=orademo; Enlist=false";
OracleConnection con = null;
Timer timer1 = null;
public OraWinSvcDemo() {
InitializeComponent();
}
protected override void OnStart(string[] args) {
// TODO: Add code here to start your service.
}
protected override void OnStop() {
// TODO: Add code here to perform any tear-down necessary to stop your service.
}
}
}
4. Change the constructor to the following to create the timer and set the handler function for the timer event:
public OraWinSvcDemo() {
InitializeComponent();
timer1 = new Timer();
timer1.Elapsed += new ElapsedEventHandler(OnTimer);
}
5. Add the OnTimer method below the constructor to handle the timer event:
private void OnTimer(object source, ElapsedEventArgs e) {
if (con != null) {
if (con.State == ConnectionState.Open) {
OracleCommand cmd = con.CreateCommand();
cmd.CommandText = "select user, sysdate from dual";
OracleDataReader dr = cmd.ExecuteReader();
while (dr.Read()) {
eventLog1.WriteEntry(String.Format("User: {0}, Date: {1}", dr[0].ToString(), dr[1].ToString()));
}
dr.Dispose();
cmd.Dispose();
con.Close();
}
}
}
6. Replace the generated OnStart method with the following which establishes a connection to the database and sets the timer properties (interval of 3 seconds and enables the timer):
protected override void OnStart(string[] args) {
eventLog1.WriteEntry("In OnStart");
con = new OracleConnection(constr);
try {
con.Open();
eventLog1.WriteEntry("Successfully connected to Oracle!");
}
catch (OracleException ex) {
eventLog1.WriteEntry("OracleException: " + ex.Message);
}
timer1.Interval = 3000;
timer1.Enabled = true;
}
7. Replace the generated OnStop method with the following code:
protected override void OnStop() {
eventLog1.WriteEntry("In OnStop");
timer1.Enabled = false;
if (con != null) {
con.Dispose();
}
}
8. Add a handler for the OnPause event for the service below the OnStop method:
protected override void OnPause() {
eventLog1.WriteEntry("In OnPause.");
timer1.Enabled = false;
}
9. Add a handler for the OnContinue event for the service below the OnPause method:
protected override void OnContinue() {
eventLog1.WriteEntry("In OnContinue.");
timer1.Enabled = true;
}
10. Add a handler for the shutdown event below the handler for the OnContinue event:
protected override void OnShutdown() {
eventLog1.WriteEntry("In OnShutdown");
timer1.Enabled = false;
if (con != null) {
con.Dispose();
}
}
11. Select File -> Save All from the main menu to save all work and File -> Close to close the Service1.cs file in the editor.
Create Installers for the Components
1. Service1.cs should in the design view mode within the editor. If it is not, right-click it in the Solution Explorer and select View Designer from the context menu.
2. Create an installer by right-clicking on the design surface and selecting Add Installer from the context menu:
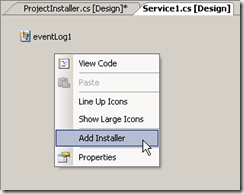
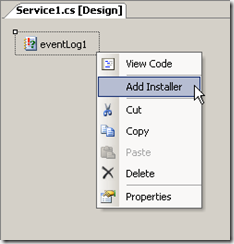
3. After clicking Add Installer, ProjectInstaller.cs will be created and opened in the editor. Click the Service1.cs [Design] tab to switch back to Service1.cs in the editor. Add an installer for the eventLog1 component by right-clicking it and selecting Add Installer from the context menu:
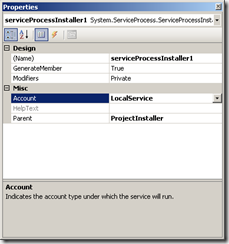
4. After adding the eventLog1 installer, left-click the serviceProcessInstaller1 component to select it. Next select LocalService from the drop-down list:
5. Select File -> Save All from the main menu to save all files.
6. Select Build -> Build OraWinService from the main menu to build the project, then select File -> Close twice to close the ProjectInstaller.cs and Service1.cs files.
Create a Setup Project for the Service
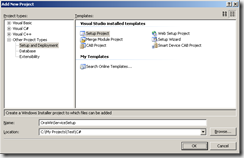
1. Select File -> Add -> New Project... from the main menu, in the Project types pane expand the Other Project Types node, select Setup and Deployment, select Setup Project in the Templates list, enter OraWinServiceSetup for the Name, and select an appropriate location (or accept the default supplied value). The Add New Project dialog should look as follows:
2. Click OK to add the setup project to the solution.
3. In Solution Explorer, right-click OraWinServiceSetup then select Add -> Project Output... from the context menu. The Add Project Output Group dialog will be displayed:
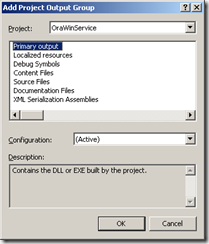
4. Ensure Primary Output is selected and click OK.
5. In Solution Explorer, right-click OraWinServiceSetup then select View -> Custom Actions from the context menu to open the custom actions in the editor.
6. In the Custom Action editor, right-click Custom Actions and select Add Custom Action... from the context menu:
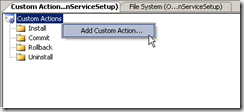
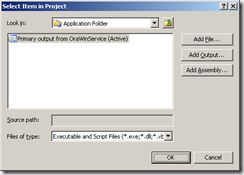
7. In the Select Item in Project dialog, double-click the Application Folder item, then select Primary output from OraWinService (Active), and click OK to add the output to each of the Install, Commit, Rollback, and Uninstall nodes:
8. Select File -> Save All from the main menu and then File -> Close for each opened file in the editor.
9. Build the setup program by right-clicking OraWinServiceSetup in Solution Explorer and selecting Build from the context menu:

Install the Windows Service
1. Using Windows Explorer navigate to the directory where the setup project was built. For example, on my system this is in C:\My Projects\Test\C#\OraWinServiceSetup\Debug directory.
2. Install the service by right-clicking the OraWinServiceSetup.msi file and selecting Install from the context menu. Step through the installation wizard to complete the installation.
Create the Database User
1. Connect to the database that the service will use as a DBA user and determine the value of the os_authent_prefix parameter:
SQL> show parameter os_authent_prefix
NAME TYPE VALUE
----------------- ----------- -----
os_authent_prefix string
2. As you can see here I do not have a value for this parameter; therefore, when I create the user I do not use a prefix:
SQL> create user "NT AUTHORITY\LOCAL SERVICE" identified externally;
User created.
SQL> grant create session to "NT AUTHORITY\LOCAL SERVICE";
Grant succeeded.
3. For more information on creating an Operating System authenticated user, see my earlier post on Configuring Windows Authentication.
Running the Service and Viewing Results
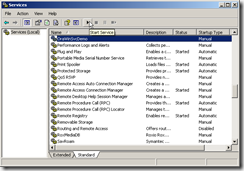
1. Open the Services management console by clicking Start -> Administrative Tools -> Services. You can also right-click the My Computer icon on the desktop and select Manage from the context menu.
2. Locate the OraWinSvcDemo service in the list of services and click the start button:
3. Open the Event Viewer by clicking Start -> Administrative Tools -> Event viewer. Or right-click the My Computer icon on the desktop and select Manage from the context menu (if you have not already done so).
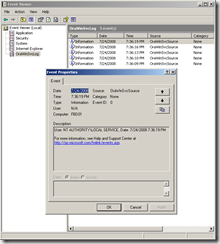
4. In the Event Viewer, select OraWinSvcLog by left-clicking it. As the service writes entries to the log every 3 seconds while it is executing, you should see several entries after a 10 seconds or so:
5. Experiment with the different service states (paused, resume, restart, etc) and verify the entries in the Event Viewer.


