Monday, July 06, 2009

Getting Started with OCCI (Windows Version)

The Oracle C++ Call Interface, also known as OCCI, is an application programming interface (API) built upon the Oracle Call Interface (OCI - another lower level API from Oracle). One of the goals of OCCI is to offer C++ programmers easy access to Oracle Database in a fashion similar to what Java Database Connectivity (JDBC) affords Java developers. If you would like to learn more about what OCCI is (and isn't), pay a visit to the OCCI documentation on Oracle Technology Network (OTN) here:

http://download.oracle.com/docs/cd/B28359_01/appdev.111/b28390/toc.htm

My goal with this "Getting Started" post is to give you one method of setting up an environment in which you can use OCCI to develop C++ applications under Windows that access Oracle Database. I am not in any way covering all possible scenarios or delving deep into OCCI itself. Please note that the database itself can be on any supported host.

The Environment

Your environment is likely to differ from mine; however, it is important to be familiar with the various components in the environment used here so that you can make adaptations as necessary for your specific environment.

  • Oracle Database Server/Host: oel01 (Oracle Enterprise Linux 32-bit server)
  • Oracle Database: SID value of OEL11GR1, Service Name value of OEL11GR1.SAND, version 11.1.0.7
  • Development Machine: Hostname of CHEPSTOW, Windows XP Professional 32-bit
  • Development IDE: Microsoft Visual C++ 2008 Express Edition (Windows SDK also installed)
  • Oracle Client: Oracle Instant Client with OCCI

Important Information

One of the most crucial attributes of working with OCCI is that you must ensure that all of the components of the development environment and the runtime environment are supported combinations and correct versions. I can not emphasize this enough. If you deviate from this, you will almost certainly find trouble! In order to find the correct combinations of products and versions, see the following links on OTN:

Download the Correct Packages

At the time of this writing, the following are the component versions supported for the environment listed above:

  • OCCI 11.1.0.6 (Visual C++9 (VS 2008)[Windows 32-bit])
  • Instant Client Version 11.1.0.6

From the download links above, you should download the following components to your development machine. I downloaded them to the C:\Temp directory.

  • OCCI 11.1.0.6 (Visual C++9 (VS 2008)[Windows 32-bit]) - occivc9win32_111060.zip
  • Instant Client Package - Basic: instantclient-basic-win32-11.1.0.6.0.zip
  • Instant Client Package - SDK: instantclient-sdk-win32-11.1.0.6.0.zip
  • Instant Client Package - SQL*Plus: instantclient-sqlplus-win32-11.1.0.6.0.zip  (optional, but I always install it)

Install the Instant Client Packages

Installing the Instant Client packages is simply a matter of unzipping them – not much to wrong here! I unzipped them all to the C:\ directory on Chepstow. This resulted in a new top-level directory - C:\instantclient_11_1 with "sdk", "vc8", and "vc7" directories underneath. The "vc8" and "vc7" directories should be ignored in the context of the environment created here.

Install the OCCI Package

Much like the Instant Client packages, the OCCI package should be unzipped; however, rather than unzipping it to the C:\ directory, I unzipped it to the C:\Temp directory. Once unzipped, review the occivc9_111060_readme.txt file for information; however, I deviate from the directories listed in the file.

I create a "vc9" directory under the "sdk" directory as follows:

C:\instantclient_11_1\sdk\lib\msvc\vc9

I create a "vc9" directory under the "instantclient_11_1" directory as follows:

C:\instantclient_11_1\vc9

I delete the oraocci11.dll and oraocci11.sym files from the C:\instantclient_11_1 directory. These files are not built/linked with the runtime libraries used by Visual Studio 2008 and, as mentioned above, it is critical that component versions match!

From the extracted OCCI files in the C:\Temp directory, move the following two files to the C:\instantclient_11_1\sdk\lib\msvc\vc9 directory previously created:

  • oraocci11.lib
  • oraocci11d.lib

From the extracted OCCI files in the C:\Temp directory, move the following four files to the C:\instantclient_11_1\vc9 directory previously created:

  • oraocci11.dll
  • oraocci11.dll.manifest
  • oraocci11d.dll
  • oraocci11d.dll.manifest

Finally, delete the oraocci11.lib file from the C:\instantclient_11_1\sdk\lib\msvc directory. Again, this file is not compatible with the environment created here.

After performing these steps, the .lib files should only be in directories under C:\instantclient_11_1\sdk\lib\msvc and the .dll and .manifest files should only be in directories under the C:\instantclient_11_1 directory. While this may seem like extra unneeded work, it results in complete separation of the various versions of the OCCI components making it easier (and explicit) which version is to be used.

To specify which version of the OCCI libraries are used, add the directory to the system path. You also add the the Instant Client directory to the path. Both of these directories should be added to the beginning of the system path:

C:\instantclient_11_1\vc9;C:\instantclient_11_1;{rest of path follows…}

Configure Visual Studio

The Windows environment has been configured to use the new OCCI and Instant Client packages but before you can begin developing in Visual Studio, you need to set a few options. Without these options Visual Studio will be unable to find the correct files and build your applications. There are two options that need to be specified:

  • Include files – allows Visual Studio to find the header files for OCCI
  • Library files – allows Visual Studio to find the library files for OCCI

Using Visual C++ 2008 Express Edition, the menu paths to specify these options are as follows:

  • Tools –> Options… Expand "Projects and Solutions" node, select "VC++ Directories", under "Show directories for:" select "Include files", double-click under the last entry to open a new box to enter a path, enter "C:\instantclient_11_1\sdk\include" and press enter
  • Under "Show directories for:" select "Library files", double-click under the last entry to open a new box to enter a path, enter "C:\instantclient_11_1\sdk\lib\msvc\vc9" and press enter
  • Click OK to save the settings

Create a Simple Test Project

All the setup work is now complete and the environment is configured! If needed, you can use the following (very!) basic application as a simple test to verify things are working as expected. Again, this is a simple example only to verify things are setup correctly. It is not intended to be a complete template for "proper" code development, etc.

Create the Visual C++ 2008 Express Edition project by selecting File –> New –> Project… from the main menu, select "Win32" as the project type, select "Win32 Console Application", give the project a name (I used OCCITest), select a location (I used C:\Projects), I unchecked "Create directory for solution", and then click OK.

Click Next in the Application Wizard, uncheck Precompiled header, click Empty project, and click Finish.

In Solution Explorer, right-click Header Files, select Add, select New Item…

In Add New Item, select Header File (.h), enter Employees.h (or any name you prefer) in Name, and click Add.

Here's the content of the file on my system:

/*
* A simple OCCI test application
* This file contains the Employees class declaration
*/

#include <occi.h>
#include <iostream>
#include <iomanip>

using namespace oracle::occi;
using namespace std;

class Employees {
public:
  Employees();
  virtual ~Employees();

  void List();

private:
  Environment *env;
  Connection  *con;

  string user;
  string passwd;
  string db;
};

In Solution Explorer, right-click Source Files, select Add, select New Item…

In Add New Item, select C++ File (.cpp), enter Employees.cpp (or any name you prefer) in Name, and click Add.

Here's the content of the file on my system:

/*
* A simple OCCI test application
* This file contains the Employees class implementation
*/

#include "Employees.h"

using namespace std;
using namespace oracle::occi;

int main (void)
{
  /*
   * create an instance of the Employees class,
   * invoke the List member, delete the instance,
   * and prompt to continue...
   */

  Employees *pEmployees = new Employees();

  pEmployees->List();

  delete pEmployees;

  cout << "ENTER to continue...";

  cin.get();

  return 0;
}

Employees::Employees()
{
  /*
   * connect to the test database as the HR
   * sample user and use the EZCONNECT method
   * of specifying the connect string. Be sure
   * to adjust for your environment! The format
   * of the string is host:port/service_name

   */

  user = "hr";
  passwd = "hr";
  db = "oel01:1521/OEL11GR1.SAND";

  env = Environment::createEnvironment(Environment::DEFAULT);

  try
  {
    con = env->createConnection(user, passwd, db);
  }
  catch (SQLException& ex)
  {
    cout << ex.getMessage();

    exit(EXIT_FAILURE);
  }
}

Employees::~Employees()
{
  env->terminateConnection (con);

  Environment::terminateEnvironment (env);
}

void Employees::List()
{
  /*
   * simple test method to select data from
   * the employees table and display the results
   */

  Statement *stmt = NULL;
  ResultSet *rs = NULL;
  string sql = "select employee_id, first_name, last_name " \
               "from employees order by last_name, first_name";

  try
  {
    stmt = con->createStatement(sql);
  }
  catch (SQLException& ex)
  {
    cout << ex.getMessage();
  }

  if (stmt)
  {
    try
    {
      stmt->setPrefetchRowCount(32);

      rs = stmt->executeQuery();
    }
    catch (SQLException& ex)
    {
      cout << ex.getMessage();
    }

    if (rs)
    {
      cout << endl << setw(8) << left << "ID"
           << setw(22) << left << "FIRST NAME"
           << setw(27) << left << "LAST NAME"
           << endl;
      cout << setw(8) << left << "======"
           << setw(22) << left << "===================="
           << setw(27) << left << "========================="
           << endl;

      while (rs->next()) {
        cout << setw(8) << left << rs->getString(1)
             << setw(22) << left << (rs->isNull(2) ? "n/a" : rs->getString(2))
             << setw(27) << left << rs->getString(3)
             << endl;
      }

      cout << endl;

      stmt->closeResultSet(rs);
    }

    con->terminateStatement(stmt);
  }
}

Before you can build the sample, you need to add the OCCI library to the input list for the linker:

Select Project –> OCCITest Properties... from the menu (substitute your project name if different)

Expand Configuration Properties node, expand Linker node, select Input item, enter "oraocci11d.lib" for a debug build or "oraocci11.lib" for a release build.

Select Build –> Build Solution from the menu to build the solution. If everything is setup correctly, there should be no errors during the build. If you receive errors, investigate and correct them.

Executing the sample should result in output as follows:

ID      FIRST NAME            LAST NAME
======  ====================  =========================
174     Ellen                 Abel
166     Sundar                Ande
130     Mozhe                 Atkinson
105     David                 Austin
204     Hermann               Baer
116     Shelli                Baida
167     Amit                  Banda
172     Elizabeth             Bates

[ snip ]

120     Matthew               Weiss
200     Jennifer              Whalen
149     Eleni                 Zlotkey

ENTER to continue...

If you are new to using OCCI on Windows with Visual Studio, perhaps the above will be helpful in getting started!
Thursday, June 18, 2009

Microsoft To Deprecate System.Data.OracleClient

I found the following to be an interesting announcement:

System.Data.OracleClient Update

It looks like Microsoft have decided to deprecate System.Data.OracleClient beginning with the .NET 4.0 release.

Of course, I'm more than a little biased when it comes to anything related to Oracle.

For more information and to download ODP.NET, please see the Oracle Data Provider for .NET center on Oracle Technology Network (OTN).

Saturday, May 30, 2009

Oracle Pro*C on Windows with Express Edition Products

NOTE: I have edited the intro text here from the original source as a result of some discussions I've had. These discussions are ongoing so I can't post the results as of yet. (3-June-2009 approximately 5:00 PM).

I thought I would take an introductory look at using the Oracle Pro*C precompiler using Express Edition products. Here are the components I will use for this purpose (links valid at time of posting):

  • Oracle Database 10g Express Edition (available here)
  • Oracle Enterprise Linux (available here)
  • Oracle Instant Client 11.1.0.7 Packages for Microsoft Windows 32-bit (available here)
  •     Instant Client Package – Basic
  •     Instant Client Package – SDK
  •     Instant Client Package – Precompiler
  •     Instant Client Package - SQL*Plus
  • Microsoft Windows XP Professional 32-bit with Service Pack 3
  • Microsoft Visual C++ 2008 Express Edition (available here)
  • Windows SDK for Windows Server 2008 and .NET Framework 3.5 (available here)

For the purposes of this discussion you will need to have already installed (or have access to) Oracle Database with the HR sample schema. You will also need to have installed Visual C++ 2008 Express Edition and the Windows SDK on the machine you will use as your development machine. For a walkthrough of installing Visual C++ 2008 Express Edition and the Windows SDK, please see this link. Note that even though the SDK seems to be only for Windows Server 2008 (based on the name) it is supported on XP, Vista, and Windows Server.

In my environment I have installed Oracle Database 10g Express Edition on a host running Oracle Enterprise Linux. The host name is "oel02" (not especially clever, I realize). The Windows XP machine that I will use as the development machine is named "chepstow" (perhaps marginally more clever) and Visual C++ Express Edition and the Windows SDK are already installed. I have downloaded the four Instant Client packages listed above to the "c:\temp" directory on chepstow. The SQL*Plus package is not required; however, I find it convenient so I always install it. So, since I already have a database server and the Microsoft tools are installed, all that remains is to install the Instant Client packages.

Installing the Instant Client Packages

It is incredibly easy to install the Instant Client packages – simply unzip them! I chose to unzip them (on chepstow, my development machine) to the "c:\" directory and this created a new "c:\instantclient_11_1" directory and various sub-directories. I then added the following two directories to the system path:

  • C:\instantclient_11_1
  • C:\instantclient_11_1\sdk

NOTE: I added the two directories to the beginning of the system path and had no other Oracle products installed. See comments for more information about this. (Added 29 June 2009 approximately 11:30 AM)

Setting up the Pro*C Configuration File

I know it is easy to skip reading a README file, but it is important that you do read the PRECOMP_README file in the Instant Client root directory. Pro*C will, by default, look for a configuration file named "pcscfg.cfg" when it is invoked. In the environment that I have created (default installs of all products) Pro*C will want to find this file in the "c:\instantclient_11_1\precomp\admin" directory. However, if you look at your install (if you have done the same as me) you will notice there is no such directory! Therefore you should create this directory ("c:\instantclient_11_1\precomp\admin"). You should then copy the "pcscfg.cfg" file from the "c:\instantclient_11_1\sdk\demo" directory to the "c:\instantclient_11_1\precomp\admin" directory.

The "pcscfg.cfg" file will initially contain the following single line:

define=(WIN32_LEAN_AND_MEAN)

Below this line you add the following four lines:

sys_include=C:\PROGRA~1\MICROS~1.0\VC\include\sys
include=C:\PROGRA~1\MICROS~3\Windows\v6.1\Include
include=C:\PROGRA~1\MICROS~1.0\VC\include
include=C:\instantclient_11_1\sdk\include

Save the file and exit your editor.

Be sure to note that the directory names above are the "short" names to ensure they do not contain spaces. If the directory names contain spaces this will cause problems with the Pro*C precompiler. To help "translate" the directories above, here are the long versions (be sure you do not enter these):

sys_include=C:\Program Files\Microsoft Visual Studio 9.0\VC\include\sys
include=C:\Program Files\Microsoft SDKs\Windows\v6.1\Include
include=C:\Program Files\Microsoft Visual Studio 9.0\VC\include
include=C:\instantclient_11_1\sdk\include

You can find the short names by using "dir /x" in a command-prompt window.

Adding Directories to Visual Studio C++ 2008 Express Edition

Next you should add the Oracle Instant Client include and library directories to Visual Studio. To do this, simply perform the following steps:

  • Select Tools –> Options to open the Options dialog
  • Expand the "Projects and Solutions" node
  • Click the "VC++ Directories" item
  • Under "Show directories for:" select "Include files"
  • Click underneath the last entry in the list (you should get a highlighted line with no text)
  • Click the folder button to create a new line
  • Enter "c:\instantclient_11_1\sdk\include" and press Enter
  • Under "Show directories for:" select "Library files"
  • Click underneath the last entry in the list (you should get a highlighted line with no text)
  • Click the folder button to create a new line
  • Enter "c:\instantclient_11_1\sdk\lib\msvc" and press Enter
  • Click the OK button to save the changes

Create a New Project

WARNING: You should create your project in a directory (and path) that has no spaces in it. If you create the project in a directory or path with spaces you will receive errors during the precompile phase. I used "c:\temp" for this example.

Now create a new project in Visual Studio:

  • Select File –> New Project to open the New Project dialog
  • Select "Win32" as the project type
  • Select "Win32 Console Application" under "Templates"
  • Give the project a name (I used "proctest" in keeping with my clever naming tradition)
  • I always choose to de-select "Create directory for solution" and click OK
  • Click the "Next" button in the application wizard
  • Click the "Empty project" checkbox under "Additional options"
  • Click the "Finish" button

Create the Pro*C Source File

To create the Pro*C source file, perform the following steps:

  • Right-click "Source Files" and select Add –> New Item… from the context menu
  • Select "Code" under "Visual C++"
  • Select "C++ File (.cpp)" under "Visual Studio installed templates" (note that you will not actually create C++ code in this example)
  • Give the file a name such as "proctest.pc" and click "Add"

Here's the Pro*C source I used for this example (this is clearly sample code and lots is left out!):

/*
** suppress certain warnings
*/
#ifdef WIN32
#define _CRT_SECURE_NO_DEPRECATE 1
#endif

#include <stdio.h>
#include <string.h>
#include <stdlib.h>
#include <sqlca.h>
#include <sqlda.h>
#include <sqlcpr.h>

EXEC SQL BEGIN DECLARE SECTION;

/*
** defines for VARCHAR lengths.
*/
#define UNAME_LEN 30
#define PWD_LEN   30
#define DB_LEN    48
#define FNAME_LEN 32
#define LNAME_LEN 32

/*
** variables for the connection
*/
VARCHAR username[UNAME_LEN];
VARCHAR password[PWD_LEN];
VARCHAR dbname[DB_LEN];

/*
** variables to hold the results
*/
int ctr;
int empid;
VARCHAR fname[FNAME_LEN];
VARCHAR lname[LNAME_LEN];

EXEC SQL END DECLARE SECTION;

/*
** declare error handling function
*/
void sql_error(char *msg)
{
  char err_msg[128];
  size_t buf_len, msg_len;

  EXEC SQL WHENEVER SQLERROR CONTINUE;

  printf("\n%s\n", msg);
  buf_len = sizeof (err_msg);
  sqlglm(err_msg, &buf_len, &msg_len);
  printf("%.*s\n", msg_len, err_msg);

  EXEC SQL ROLLBACK RELEASE;

  exit(EXIT_FAILURE);
}

void main()
{
  /*
  ** Copy the username into the VARCHAR.
  */
  strncpy((char *) username.arr, "hr", UNAME_LEN);
  username.len = strlen("hr");
  username.arr[username.len] = '\0';

  /*
  ** Copy the password.
  */
  strncpy((char *) password.arr, "hr", PWD_LEN);
  password.len = strlen("hr");
  password.arr[password.len] = '\0';

  /*
  ** copy the dbname (using EZCONNECT syntax)
  */
  strncpy((char *) dbname.arr, "oel02/XE", DB_LEN);
  dbname.len = strlen("oel02/XE");
  dbname.arr[dbname.len] = '\0';

  /*
  ** register sql_error() as the error handler.
  */
  EXEC SQL WHENEVER SQLERROR DO sql_error("ORACLE error--\n");

  /*
  ** Connect to database.  Will call sql_error()
  ** if an error occurs when connecting.
  */
  EXEC SQL CONNECT :username IDENTIFIED BY :password USING :dbname;

  printf("\nConnected to ORACLE as user: %s\n\n", username.arr);

  /*
  ** simple select statement
  */
  EXEC SQL DECLARE emps CURSOR FOR
    SELECT   employee_id,
             first_name,
             last_name
    FROM     employees
    ORDER BY last_name,
             first_name;

  /*
  ** open the cursor
  */
  EXEC SQL OPEN emps;

  /*
  ** when done fetching break out of the for loop
  */
  EXEC SQL WHENEVER NOT FOUND DO break;

  /*
  ** simple counter variable
  */
  ctr = 0;

  /*
  ** print a little header
  */
  printf("Employee ID  First Name            Last Name\n");
  printf("===========  ====================  =========================\n");

  /*
  ** fetch all the rows
  */
  for (;;)
  {
    EXEC SQL FETCH emps into :empid, :fname, :lname;

    /*
    ** null-terminate the string values
    */
    fname.arr[fname.len] = '\0';
    lname.arr[lname.len] = '\0';

    /*
    ** print the current values
    */
    printf("%-13d%-22s%-25s\n", empid, fname.arr, lname.arr);

    ctr++;
  }

  /*
  ** close the cursor
  */
  EXEC SQL CLOSE emps;

  /*
  ** provide simple feedback on how many rows fetched
  */
  printf("\nFetched %d employees.\n", ctr);

  /*
  ** disconnect from database
  */
  EXEC SQL ROLLBACK WORK RELEASE;

  /*
  ** have a nice day
  */
  exit(EXIT_SUCCESS);
}


Add a Reference to the Generated C Source File

The output of the Pro*C precompiler is either C or C++ source code (C in this case). However, because we are working with only a Pro*C source file we need to tell Visual Studio about the file that will be generated. To do this we add a reference to the not yet generated file:

  • Select Project –> Add New Item to open the Add New Item dialog
  • Select "Code" under "Visual C++"
  • Select "C++ File (.cpp)" under "Visual Studio installed templates"
  • Type "proctest.c" in the "Name" textbox and click "Add"
  • Next close the (empty) file after it is created

Add the Pro*C Library File to the Project

  • Select Project –> <project name> Properties… to open the Property Pages dialog
  • Expand the "Configuration Properties" node
  • Expand the "Linker" node
  • Click the "Input" item
  • In the "Additional Dependencies" type "orasql11.lib" and click "OK" to save the changes

Add the Custom Build Step

In order for Visual Studio to be able to invoke the Pro*C executable (proc.exe) to create the C source code file, a custom build step needs to be created:

  • Right-click "proctest.pc" in the Solution Explorer and select "Properties" from the context menu
  • Select "Custom Build Step"
  • For "Command Line" type "proc.exe $(ProjectDir)$(InputName).pc"
  • For "Outputs" type "$(ProjectDir)$(InputName).c"
  • Click "OK" to save the custom build step

This step will cause Visual Studio to invoke proc.exe on the input file (proctest.pc) and create an output file called "proctest.c" which will then be compiled as normal. This is really the key step in the whole process I suppose. This custom build step is the "integration" of Pro*C into Visual Studio.

Build the Sample and Verify

All the hard work is now done and it is time to build the sample!

  • Select Build –> Build Solution

If all has gone well you should see output similar to the following in the output window:

proctest - 0 error(s), 0 warning(s)
========== Build: 1 succeeded, 0 failed, 0 up-to-date, 0 skipped ==========

If there are errors reported you will need to investigate and correct the cause.

Upon completion of a successful build, you can execute the program and verify the results:

C:\temp\proctest\Debug>proctest

Connected to ORACLE as user: hr

Employee ID  First Name            Last Name
===========  ====================  =========================
174          Ellen                 Abel
166          Sundar                Ande
130          Mozhe                 Atkinson

[ snip ]

120          Matthew               Weiss
200          Jennifer              Whalen
149          Eleni                 Zlotkey

Fetched 107 employees.

C:\temp\proctest\Debug>


Conclusion

Whew! That's a lot of work! As I mentioned at the beginning of this post, this is intended to be an introductory look at using Pro*C and Visual C++ 2008 Express Edition. There is, of course, much more that Pro*C can do and this simple example of selecting from the "employees" table in the "hr" schema is exactly that: a simple example. It is not intended to be a complete tutorial but perhaps it will be helpful in working with Pro*C and Visual Studio if you choose to do so. You should be able to adapt the steps here to using the "full" version of Visual Studio or Oracle Client.

If you made it this far, thanks for stopping by. I hope this was helpful in some regard.


NOTE: Some comments below were recently deleted by me at the request of the poster. I have, therefore, deleted my responses to those comments as they made no sense on their own. (1-June-2009 approximately 1:10 PM)

Monday, March 30, 2009

jmp'ing around Win64 with ml64.exe and Assembly Language

I've been fascinated by (and interested in) assembly language for a number of years. I fondly remember my "Peter Norton Assembly" book and wish I hadn't sent it to a better home several years ago. But, hey, it was a major moving of house and I had to have as few items as possible. The sacrifices we make…

Anyway, I had some spare time this past weekend and decided to try and see if I could get a simple 64-bit assembly language program working under Win64. My goal was to write some text to a console window and exit without destroying my entire system. I managed to succeed in that endeavor and had a bit of fun along the way. My wife thinks I have a bizarre definition of fun. If you continue to read the rest of this post keep in mind I said I was "interested" in assembly. By no means is this intended to be a tutorial or guide in writing efficient and professional assembly! As the comments in the code indicate, there was no true attempt at optimization, etc!

A couple of links that I ran across and found helpful (Links accurate as of today. Who knows what the future may bring?):

- Matt Pietrek's X64 Primer column from the May 2006 MSDN Magazine found here.

- Raymond Chen's Blog (The Old New Thing) posting entitled "The History of Calling Conventions, Part 5: AMD64" found here.

In order to make the code just a tiny bit more interesting I decided to call the "cpuid" function to get the Vendor ID from the processor and write that out as well as some static text. Information on the "cpuid" function is available in pdf format on both the Intel and AMD websites. One thing that I found interesting is that the 4 byte chunks (of which there are 3) that make up the output of the Vendor ID request from the "cpuid" function are stored in the registers in an "out of order" fashion. Look at the code below that gets the chunks from the registers and you'll see what I mean (I hope).

My First-Ever Windows 64-bit Assembly Language Program With Comments and Everything

NOTE: Multiple edits made per comment(s) etc. over time

; a (very) simple x64 masm (ml64.exe) demo that calls the cpuid function
; and writes the results to a console window.

; this is a simple experiment and almost certainly not very good assembly code
; for one thing there is no attempt at true optimization (like removing duplicate
; sections of code) or error handling.

; args are passed in registers as follows:
; RCX: 1st integer argument
; RDX: 2nd integer argument
; R8: 3rd integer argument
; R9: 4th integer argument
; the stack is used for args beyond 4 (after space reserved for first 4)
; this reserved space on the stack for first 4 arguments is
; the "register home space" or "register parameter stack area"

; unlike win32 the caller is responsible for cleaning the stack rather than
; the callee

; win api functions that are called below.
; this is a small optimization in that if
; call by name such as GetStdHandle there
; will be a stub generated that then jumps
; to the proper location. this avoids that
; extra jump from the stub location.
externdef __imp_GetStdHandle : qword
externdef __imp_ExitProcess  : qword
externdef __imp_WriteFile    : qword
externdef __imp_lstrlen      : qword

; the variables used in the main code below such as the text to write
; typically carriage return (13) and line feed (10) CRLF would not be
; embedded in the string values but this is a simple test / demo
.data
hFile        qword 0
msglen       dword 0
BytesWritten dword 0
vndrid       byte  13, 10, "The processor Vendor ID is 'xxxxxxxxxxxx'.", 13, 10, 0

; these are read-only
.const
supp         byte  13, 10, 'CPUID instruction supported!', 13, 10, 0
nosupp       byte  13, 10, 'CPUID instruction NOT supported!', 13, 10, 0

; and we're off...

.code
main proc frame
  ; registers that should be preserved (non-volatile)
  ; rbp, rbx, rdi, rsi, rsp, r12, r13, r14, r15

  ; prologue (there are other options)
  ; frame pointer in rbp is used because the code to check
  ; if cpuid is available changes rsp (via pushes and pops).
  ; stack modification outside of prologue requires frame pointer.
  ; the frame pointer is not directly used in this code.
  ; refer to "x64 exception handling" in "x64 ABI conventions".
  push rbx                       ; rbx is a non-volatile register used below, stack aligned
  .pushreg rbx                   ; unwind info
  push rbp                       ; pushing rbp mis-aligns stack again
  .pushreg rbp                   ; unwind info
  sub rsp, 28h                   ; adjust stack for register home space and parameter(s)
                                 ; WriteFile takes 5 parameters and thus uses stack for 5th
                                 ; also align on a 16 byte boundary
  .allocstack 28h                ; unwind info stack allocation
  mov rbp, rsp                   ; save current rsp into rbp as frame pointer
  .setframe rbp, 0               ; frame pointer (offset 0 - points to base not *into* frame
                                 ; which would be more typical). see above notes about usage.
  .endprolog                     ; unwind info mark end of prologue

  ; get the handle for the console window to use when writing text
  ; this is used by WriteFile win api function below
  mov ecx, -11                   ; put -11 (STD_OUTPUT_HANDLE) into ecx (dword)
  call __imp_GetStdHandle
  mov hFile, rax                 ; move returned handle to hFile

  ; check that the cpuid instruction is supported
  ; this is very likely supported, but here for completeness
  ; taken from the AMD64 Architecture Programmer's Manual
  ; Volume 3: General-Purpose and System Instructions
  pushfq                         ; save FLAGS
  pop rax                        ; store FLAGS in RAX
  mov rbx, rax                   ; save in RBX for test
  xor rax, 200000h               ; toggle bit #21 (i.e. 22nd bit)
  push rax                       ; put result on stack
  popfq                          ; save changed RAX to FLAGS
  pushfq                         ; push FLAGS onto stack
  pop rax                        ; store FLAGS in RAX
  cmp rax, rbx                   ; determine if bit #21 changed
  je no_cpuid                    ; cpuid not supported (bit did not change)

  ; The Windows 64-bit paradigm includes allocating the largest amount
  ; of stack space needed and then reusing that space. As such the
  ; stack pointer (rsp) does not change typically due to the reduced
  ; usage of pushes (and matched pops). There are no operations from
  ; this point that change rsp so it is used for providing offsets.
  ; If rsp did change (as it would in the above section of code) then
  ; using rbp (or other register as a frame pointer) would be better.
  ; And in such a case the register used as a frame pointer would point
  ; into the frame rather than at the base (as noted above).

  ; cpuid is supported if we did not jump...
  ; so print the message that it is supported and then
  ; jump to location where it is actually performed
  lea rcx, supp                  ; load address of supp text into rcx
  call __imp_lstrlen             ; call win api function to get length of text
  mov msglen, eax                ; move length of string from eax to msglen

  mov qword ptr [rsp + 32], 0    ; LPOVERLAPPED lpOverlapped
  lea r9, BytesWritten           ; LPDWORD lpNumberOfBytesWritten
  mov r8d, msglen                ; DWORD nNumberOfBytesToWrite
  lea rdx, supp                  ; LPCVOID lpBuffer
  mov rcx, hFile                 ; HANDLE hFile
  call __imp_WriteFile           ; call win api to write text to console

  jmp do_cpuid                   ; jump over the no_cpuid code path

no_cpuid:
  lea rcx, nosupp                ; load address of nosupp text into rcx
  call __imp_lstrlen             ; call win api function to get length of text
  mov msglen, eax                ; move length of string from eax to msglen

  mov qword ptr [rsp + 32], 0    ; LPOVERLAPPED lpOverlapped
  lea r9, BytesWritten           ; LPDWORD lpNumberOfBytesWritten
  mov r8d, msglen                ; DWORD nNumberOfBytesToWrite
  lea rdx, nosupp                ; LPCVOID lpBuffer
  mov rcx, hFile                 ; HANDLE hFile
  call __imp_WriteFile           ; call win api to write text to console

  jmp exit                       ; the no support message was written, so exit

do_cpuid:
  lea rcx, vndrid                ; load address of vndrid text into rcx
  call __imp_lstrlen             ; call win api function to get length of text
  mov msglen, eax                ; move length of string from eax to msglen

  xor eax, eax                   ; 0 indicates we want the vendor id string
  cpuid                          ; invoke the cpuid instruction to get the string
                                 ; the results are now in ebx, edx, and ecx

  ; replace the 'x' placeholders with the vendor id
  lea r9, vndrid

  mov [r9+30], ebx               ; the first 4 bytes of the vendor id
  mov [r9+34], edx               ; the next 4 bytes of the vendor id
  mov [r9+38], ecx               ; the final 4 bytes of the vendor id

  mov qword ptr [rsp + 32], 0    ; LPOVERLAPPED lpOverlapped
  lea r9, BytesWritten           ; LPDWORD lpNumberOfBytesWritten
  mov r8d, msglen                ; DWORD nNumberOfBytesToWrite
  lea rdx, vndrid                ; LPCVOID lpBuffer
  mov rcx, hFile                 ; HANDLE hFile
  call __imp_WriteFile           ; call win api to write text to console

exit:
  xor ecx, ecx                   ; return value of 0 passed as UINT parameter to ExitProcess
  call __imp_ExitProcess         ; exit in Windows-friendly manner rather than typical epilogue
                                 ; such as would be present outside of this entry point procedure
                                 ; nothing after here would execute so no epilogue etc.
main endp

end

The command I used to compile the above is (apologies if wrapping make it difficult to read):

ml64 test64.asm /link /subsystem:console /defaultlib:"C:\Program Files\Microsoft SDKs\Windows\v6.0A\Lib\x64\kernel32.lib" /entry:main

And for the moment of truth…

C:\My Projects\Test\ASM\test>test64

CPUID instruction supported!

The processor Vendor ID is 'GenuineIntel'.

Hurray! Unless you sell AMD chips then you might think 'AuthenticAMD' would look better…

If you see something profoundly wrong in the above, please let me know. It's not like I am going to be churning out assembly code all of a sudden, but I would still be interested in knowing…

Tuesday, March 24, 2009

ODP.NET Tip: Bind Variables, the BindByName Property, and PL/SQL Function Return Values

A question was posed as a follow-up to a previous post here:

http://oradim.blogspot.com/2007/08/odpnet-tip-bind-variables-and.html

The poster wanted to know if you have set BindByName to "true" for an OracleCommand object and the command text for that object calls a PL/SQL function (which of course has a return value but no name), what name should you give to the parameter object that will receive the return value? It's a good question since BindByName set to "true" implies that you've given names to your bind variables!

The short answer is: It doesn't matter as it will be ignored anyway.

As in The Highlander movies, with return values, there can be only one. You can set ParameterDirection to "ReturnValue" for multiple parameters, but it is an error to do so. Try it and see what errors are raised.

Here's a quick little demo showing that it does not matter what name you give to the parameter that you declare as the return value.

First create a simple PL/SQL function (so that there is a return value!) like this:

create or replace function subtract_numbers(p1 in number, p2 in number) return number as
begin
  return p1 - p2;
end;
/

I've elected to do a simple bit of subtraction and this is for a reason. Since in subtraction the order of the parameters matters, it is easy to show that the parameters are being handled in the correct order. As you'll see in the sample code below, I use the values "48" and "2" so it would be obvious if the ordering were reversed.

Now, here's some simple (and normal caveats about no error handling, etc. apply) bit of C# to illustrate the point:

using System;
using System.Data;
using Oracle.DataAccess.Client;
using Oracle.DataAccess.Types;

class Program
{
  static void Main(string[] args)
  {
    // adjust connect string to suit your environment
    string constr = "user id=hr;" +
                    "password=hr;" +
                    "data source=orademo;" +
                    "pooling=false;" +
                    "enlist=false";

    // create and open connection
    OracleConnection con = new OracleConnection(constr);
    con.Open();

    // create command object
    OracleCommand cmd = con.CreateCommand();
    cmd.CommandText = "subtract_numbers";
    cmd.CommandType = CommandType.StoredProcedure;

    // set bindbyname to true so parameters can be added
    // in any order and to illustrate what happens with a
    // return value
    cmd.BindByName = true;

    // the first input parameter to the pl/sql function
    OracleParameter p1 = new OracleParameter();
    p1.Direction = ParameterDirection.Input;
    p1.OracleDbType = OracleDbType.Int64;
    p1.ParameterName = "p1";
    p1.Value = 48;

    // the second input parameter to the pl/sql function
    OracleParameter p2 = new OracleParameter();
    p2.Direction = ParameterDirection.Input;
    p2.OracleDbType = OracleDbType.Int64;
    p2.ParameterName = "p2";
    p2.Value = 2;

    // the return parameter from the pl/sql function
    OracleParameter p3 = new OracleParameter();
    p3.Direction = ParameterDirection.ReturnValue;
    p3.OracleDbType = OracleDbType.Int64;
    p3.ParameterName = "ignored";

    // add the parameters in a "wrong" order since
    // bindbyname is true -- this is key
    cmd.Parameters.Add(p1);  // input #1
    cmd.Parameters.Add(p3);  // return value
    cmd.Parameters.Add(p2);  // input #2

    // execute the stored pl/sql code
    cmd.ExecuteNonQuery();

    // write the result to the console window
    Console.WriteLine("The difference of {0} and {1} is {2}",
      p1.Value, p2.Value, p3.Value);

    // prevent console window from closing when run from VS
    Console.WriteLine();
    Console.Write("ENTER to continue...");
    Console.ReadLine();
    // clean up
    p3.Dispose();
    p2.Dispose();
    p1.Dispose();
    cmd.Dispose();
    con.Dispose();
  }
}

Notice how the parameters are added to the parameter collection "out of order". This is OK since BindByName is set to "true". You can comment out the line that sets BindByName and see an exception raised if you want. Anyway, when I execute this code, I get the expected results as follows:

The difference of 48 and 2 is 46

ENTER to continue...

So, even though the return value parameter was added to the collection in the second position everything works as desired. Yes, but I gave it a name of "ignored" so how do we know that name is not really being used? Well there are two easy ways to find out. One, just don't give the parameter a name at all and everything should continue to execute just fine. It's easy to ignore a name that's not there! Or, two, if you are an inquisitive type, enable SQL tracing (search the web for 10046 trace -- you'll find a million hits) and see what ODP.NET actually sent to the database. Here's a snippet of a trace file from the above code (with the parameter name of "ignored" in place):

PARSING IN CURSOR #2 len=54 dep=0 uid=82 oct=47 lid=82 tim=10601980885 hv=1771638930 ad='7ff39775518' sqlid='gx0kvypntk44k'
Begin :ret := subtract_numbers(p1=>:v0, p2=>:v2); End;
END OF STMT
PARSE #2:c=0,e=0,p=0,cr=0,cu=0,mis=0,r=0,dep=0,og=1,plh=0,tim=10601980885
BINDS #2:
Bind#0
  oacdty=02 mxl=22(21) mxlc=00 mal=00 scl=00 pre=00
  oacflg=03 fl2=1000000 frm=00 csi=00 siz=72 off=0
  kxsbbbfp=1bb2dd60  bln=22  avl=00  flg=05
Bind#1
  oacdty=02 mxl=22(21) mxlc=00 mal=00 scl=00 pre=00
  oacflg=03 fl2=1000000 frm=00 csi=00 siz=0 off=24
  kxsbbbfp=1bb2dd78  bln=22  avl=02  flg=01
  value=48
Bind#2
  oacdty=02 mxl=22(21) mxlc=00 mal=00 scl=00 pre=00
  oacflg=03 fl2=1000000 frm=00 csi=00 siz=0 off=48
  kxsbbbfp=1bb2dd90  bln=22  avl=02  flg=01
  value=2

See how ODP.NET generated a little anonymous block and substituted "ret" for the return value parameter? You should see the same thing even if there is no name given to the return parameter. You can also clearly see how the input parameter names are associated with the input values.

Saturday, March 14, 2009

HotSos Symposium 2009 Materials

The paper and all sample code from my HotSos Symposium 2009 presentation entitled "Instrumented Code Is Better Code" is available as a single .zip file. To download the .zip file, click here.

Tuesday, January 20, 2009

Oracle ACE Director No More

Today marks my first day back at Oracle Corp. and I find myself in the same boat as Kevin Closson. I'm not saying I'm sitting in the same section mind you, just that I am in the same boat as regards to no longer being eligible for the Oracle ACE program.

I think I have removed the ACE and Director logos as well as text from the appropriate spots, but if I missed a place or two, well, I'll try to get them removed too!

As Kevin says, at least there is that vest thing...

Saturday, January 10, 2009

So, back to Oracle then?

Next week will mark the last week at my current location as I have recently decided to return to Oracle Corp.

I will be going back to the world of C and UNIX derivatives having accepted a position on the non-Windows PLBDE team.

It's hard to say what that will mean for the blog here, which has been pretty quiet from my side as of late to be sure, but perhaps I will branch out from my typical topics of ODP.NET and/or Oracle on Windows. We'll see.

Friday, November 07, 2008

HotSos Symposium 2009

The HotSos Symposium 2009 is coming up soon. For 2009, the symposium runs from 8 March through to 12 March. This is always one of my favorite conferences of the year, and I will be presenting on "Instrumented Code is Better Code".

The conference, as always, features a fantastic line-up this year. I'm particularly interested in the keynote being delivered by Chris Date. In addition, Jonathan Lewis will be delivering the training day material. If you have the opportunity to attend this conference, I highly recommend it.

Now, I'd better get to work!

Thursday, October 16, 2008

Does ODP.NET Send Data to the Server for Out PL/SQL Parameters?

I was recently discussing (and by that I mean trading emails) with a friend about an interesting behavior observed when using PL/SQL "out" VARCHAR2 variables with ODP.NET - in this case it looks like ODP.NET is sending data from the client and to the server for a parameter that is defined as "out" in a PL/SQL procedure. This seems like strange behavior and I don't have a good answer as to why data would be sent from the client to the server for a parameter declared as an "out" parameter.

In any case here's a quick and dirty sample that illustrates this (on my test system anyway):

PL/SQL Procedure

create or replace procedure ptest (p_vc out varchar2) as
begin
  p_vc := rpad ('a', 31999, 'a');
end;
/

C# Sample Console

using System;
using System.Data;
using System.Data.OracleClient;
using Oracle.DataAccess.Client;
using Oracle.DataAccess.Types;

namespace Miscellaneous {
  class Program {
    static void Main(string[] args) {
      string constr = "User Id=markwill;" +
                      "Password=oracle;" +
                      "Data Source=orademo;" +
                      "Pooling=false;" +
                      "Enlist=false";

      TestODP(constr);

      TestMS(constr);

      Console.WriteLine();
      Console.Write("ENTER to continue...");
      Console.ReadLine();
    }

    static void TestODP(string constr) {
      Oracle.DataAccess.Client.OracleConnection con = new Oracle.DataAccess.Client.OracleConnection(constr);
      con.Open();

      Oracle.DataAccess.Client.OracleCommand cmd = con.CreateCommand();

      cmd.CommandText = "alter session set events '10046 trace name context forever, level 12'";
      cmd.ExecuteNonQuery();

      cmd.CommandText = "ptest";
      cmd.CommandType = CommandType.StoredProcedure;
      cmd.BindByName = true;

      Oracle.DataAccess.Client.OracleParameter p_vc = new Oracle.DataAccess.Client.OracleParameter();
      p_vc.ParameterName = "p_vc";
      p_vc.OracleDbType = OracleDbType.Varchar2;
      p_vc.Size = 32000;
      p_vc.Direction = ParameterDirection.Output;

      cmd.Parameters.Add(p_vc);

      cmd.ExecuteNonQuery();

      Console.WriteLine("p_vc = {0}", p_vc.Value);

      p_vc.Dispose();
      cmd.Dispose();
      con.Dispose();
    }

    static void TestMS(string constr) {
      System.Data.OracleClient.OracleConnection con = new System.Data.OracleClient.OracleConnection(constr);
      con.Open();

      System.Data.OracleClient.OracleCommand cmd = con.CreateCommand();

      cmd.CommandText = "alter session set events '10046 trace name context forever, level 12'";
      cmd.ExecuteNonQuery();

      cmd.CommandText = "ptest";
      cmd.CommandType = CommandType.StoredProcedure;

      System.Data.OracleClient.OracleParameter p_vc = new System.Data.OracleClient.OracleParameter();
      p_vc.ParameterName = "p_vc";
      p_vc.OracleType = OracleType.LongVarChar;
      p_vc.Size = 32000;
      p_vc.Direction = ParameterDirection.Output;

      cmd.Parameters.Add(p_vc);

      cmd.ExecuteNonQuery();

      Console.WriteLine("p_vc = {0}", p_vc.Value);

      cmd.Dispose();
      con.Dispose();
    }
  }
}

This is pretty straight-forward and simply opens a connection, enables Extended SQL Tracing via setting event 10046, creates a parameter for the output value, and calls the stored procedure.

Looking at the respective trace files I find this for the ODP.NET test:

PARSING IN CURSOR #4 len=28 dep=0 uid=88 oct=47 lid=88 tim=9306513611 hv=1721325005 ad='7ff2eca8c38' sqlid='dk08s2dm9kpfd'
Begin ptest(p_vc=>:v0); End;
END OF STMT
PARSE #4:c=0,e=798,p=0,cr=0,cu=0,mis=0,r=0,dep=0,og=1,tim=9306513607
WAIT #4: nam='SQL*Net more data from client' ela= 48 driver id=1413697536 #bytes=44 p3=0 obj#=-1 tim=9306513786
WAIT #4: nam='SQL*Net more data from client' ela= 7 driver id=1413697536 #bytes=24 p3=0 obj#=-1 tim=9306513827
WAIT #4: nam='SQL*Net more data from client' ela= 171 driver id=1413697536 #bytes=4 p3=0 obj#=-1 tim=9306514027
WAIT #4: nam='SQL*Net more data from client' ela= 28 driver id=1413697536 #bytes=49 p3=0 obj#=-1 tim=9306514085
BINDS #4:
Bind#0
  oacdty=01 mxl=32767(32000) mxlc=32000 mal=00 scl=00 pre=00
  oacflg=03 fl2=1000010 frm=01 csi=178 siz=32767 off=0
  kxsbbbfp=1c3d8000  bln=32767  avl=32000  flg=05
  value="Ä6¿¿"...
WAIT #4: nam='SQL*Net message to client' ela= 3 driver id=1413697536 #bytes=1 p3=0 obj#=-1 tim=9306514373
WAIT #4: nam='SQL*Net more data to client' ela= 49 driver id=1413697536 #bytes=8216 p3=0 obj#=-1 tim=9306514456
WAIT #4: nam='SQL*Net more data to client' ela= 23 driver id=1413697536 #bytes=8192 p3=0 obj#=-1 tim=9306514507
WAIT #4: nam='SQL*Net more data to client' ela= 271 driver id=1413697536 #bytes=8192 p3=0 obj#=-1 tim=9306514805
EXEC #4:c=0,e=1139,p=0,cr=0,cu=0,mis=0,r=1,dep=0,og=1,tim=9306514839
XCTEND rlbk=0, rd_only=1
WAIT #4: nam='SQL*Net message from client' ela= 69517 driver id=1413697536 #bytes=1 p3=0 obj#=-1 tim=9306584449
XCTEND rlbk=0, rd_only=1

As you can see there are several "SQL*Net more data from client" messages. Of course, these are followed by the sending of data to the client.

Now here is the relevant portion of the trace file for the MS provider test:

PARSING IN CURSOR #3 len=30 dep=0 uid=88 oct=47 lid=88 tim=9306615423 hv=1003497284 ad='7ff27721950' sqlid='42zzxzhxx09u4'
begin ptest(p_vc=>:p_vc); end;
END OF STMT
PARSE #3:c=0,e=1507,p=0,cr=0,cu=0,mis=0,r=0,dep=0,og=1,tim=9306615420
BINDS #3:
Bind#0
  oacdty=01 mxl=32767(32000) mxlc=32000 mal=00 scl=00 pre=00
  oacflg=03 fl2=1000010 frm=01 csi=178 siz=32767 off=0
  kxsbbbfp=1c3d8000  bln=32767  avl=00  flg=05
WAIT #3: nam='SQL*Net message to client' ela= 3 driver id=1413697536 #bytes=1 p3=0 obj#=-1 tim=9306615726
WAIT #3: nam='SQL*Net more data to client' ela= 69 driver id=1413697536 #bytes=8216 p3=0 obj#=-1 tim=9306615822
WAIT #3: nam='SQL*Net more data to client' ela= 18 driver id=1413697536 #bytes=8192 p3=0 obj#=-1 tim=9306615861
WAIT #3: nam='SQL*Net more data to client' ela= 200 driver id=1413697536 #bytes=8192 p3=0 obj#=-1 tim=9306616081
EXEC #3:c=0,e=612,p=0,cr=0,cu=0,mis=0,r=1,dep=0,og=1,tim=9306616112
XCTEND rlbk=0, rd_only=1
WAIT #3: nam='SQL*Net message from client' ela= 60351 driver id=1413697536 #bytes=1 p3=0 obj#=-1 tim=9306676628
XCTEND rlbk=0, rd_only=1

In this case there are no messages from the client and in the bind section there is no "value=" element.

An interesting wrinkle is that if I set the parameter direction to "ParameterDirection.InputOutput" using ODP.NET I do not observe the sending of data from the client.

Why, I wonder, does ODP.NET send data to the server for an output parameter? Ideas? Similar behavior observed?

Thursday, September 25, 2008

Oracle Open World 2008 Podcast

I've never really been a prolific blogger and the "interruption" of OOW 2008 has definitely impacted this. However, my podcast with Tom Haunert of Oracle Magazine is now available at the following location:

Oracle Magazine Feature Casts

The title of the podcast is:

Origins of a .NET Developer

Wednesday, August 27, 2008

My Current Development Environment

Whilst I am primarily a DBA during the day, one of the things that I really enjoy about my current engagement is that it has given me the opportunity to dip my toes back in the development pool a bit. I was describing my current development environment to a friend recently and this person was shocked by the details. I realize that in this day and age of code spitters (term coined by Jeff Richter?) and "click through the wizard for instant coding success" sorts of activities that this environment is something of an anachronism.

Without further ado, the o/s:

$ uname -a
HP-UX zzz B.11.31 U ia64 4131905082 unlimited-user license

My "IDE":

$ which vi
/usr/bin/vi

And the compiler:

$ gcc -v
Using built-in specs.
Target: ia64-hp-hpux11.31
Configured with: ../gcc/configure
Thread model: posix
gcc version 4.2.1

Yes, I actually have to do things like create a Makefile in such an environment!

Joking aside though, one of the things that I firmly believe is that instrumented code is better code. One of the characteristics of this kind of development environment, I feel, is that it really encourages strongly instrumenting the code. Yes, in some circumstances I could use the gdb debugger, but building proper instrumentation into the code and offering a simple switch to enable it (yes, it is in the release build) works very nicely.

Another thing that some people might find "weird" about this application is that it is a database application (Oracle of course) that contains absolutely no SQL statements. Really. It is a "thick database" application (Toon Koppelaars term?). That is, there are many statements like "begin package.procedure...; end;" in the code. All the real work is done using PL/SQL packages (and bodies) in the database.

As a .NET developer it is often easy to lean heavily on Visual Studio for debugging, but I think Microsoft also agrees with the "instrumented code is better code" philosophy - check out the System.Diagnostics.Trace class in the Visual Studio Combined Help Collection for more information.

Lastly, if I've misappropriated any of the terms above, apologies!

Friday, August 22, 2008

Oracle OpenWorld 2008 - Just Say Hi!

Just a quick note... if you happen to be coming to Oracle OpenWorld 2008 in San Francisco, I will be helping out in the .NET Hands-On Labs Monday (22 Sep) afternoon. I'll also be at the "OTN ACE Office Hours" on Monday (22 Sep) as well as Thursday (25 Sep). See the link for schedules as well as the great folks who will be available. I've also been known to be around the demo grounds booth as well. Please say "hi" if you get the chance!

Thursday, July 24, 2008

Creating a Windows Service that uses ODP.NET, Oracle Database, a Custom Event Log, and Local Service

The steps necessary to create a Windows Service that accesses Oracle Database via ODP.NET and uses the "NT AUTHORITY\LOCAL SERVICE" low-privileged operating system account are not substantially different from the steps necessary to create a service that does not access Oracle Database. As such, the steps below are substantially similar to the steps in the "Walkthrough: Creating a Windows Service Application in the Component Designer" topic available in the Visual Studio Programmer's Guide for the .NET Framework. You may wish to review this walkthrough in addition to the steps I provide below.

My goal is to provide the steps necessary to create a (very) simplistic Windows Service that uses the "NT AUTHORITY\LOCAL SERVICE" account to "talk" to Oracle Database. This is by no means an all-encompassing treatment of the topic of using a Windows Service in conjunction with ODP.NET, etc. However, it should provide the minimum amount of information to get started down this path.

So, without further ado, let's get started...

The Setup

Because this solution needs an installer, I am not using an Express Edition of Visual Studio. I'm using Visual Studio 2005 with ODP.NET 11.1.6.20 on a Windows XP Professional machine. This machine will also serve as the deployment target for the installer and is hosting an Oracle 11g Release 1 database.

Create the Visual Studio Project

1.  Select File -> New -> Project... from the main menu.

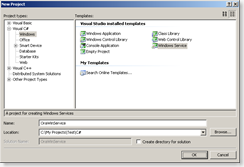
2.  In the New Project dialog expand the Visual C# node under Project types, click the Windows option, select Windows Service in the Templates list, enter OraWinService as the Name, and select an appropriate location (or simply accept the suggested location). The New Project dialog should resemble the following:

OraWinService01

3.  Click OK to create the project.

Add a Reference to the ODP.NET Assembly

1.  Select Project -> Add Reference... from the main menu.

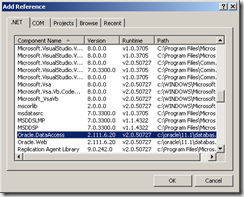
2.  In the Add Reference dialog, scroll down and select Oracle.DataAccess under the Component Name. The dialog should look similar to the following:

OraWinService02

3. Click OK to add the reference.

Set the Service Properties

1.  The Service1.cs file should be displayed in the design view. If it is not, right-click the Service1.cs file in the Solution Explorer and select View Designer.

2.  Ensure the Service1.cs file is selected in the designer by clicking anywhere on the surface except for on the hyperlinks.

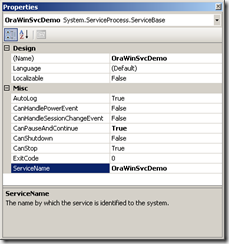
3.  In the Properties window for Service1.cs, enter OraWinSvcDemo for the (Name) property. Also enter OraWinSvcDemo for the ServiceName property. Set the CanPauseAndContinue property to True. The AutoLog property should also be set to True, which is the default. When complete, the Properties window should resemble:

OraWinService03

Edit the Main Method

1.  Double-click the Program.cs file in the Solution Explorer to open it in the editor.

2.  Replace the auto-created Main method with the following code:

static void Main() {
  System.ServiceProcess.ServiceBase[] ServicesToRun;
  ServicesToRun = new System.ServiceProcess.ServiceBase[] { new OraWinSvcDemo() };
  System.ServiceProcess.ServiceBase.Run(ServicesToRun);
}

3.  Select File -> Save All from the main menu and then select File -> Close from the main menu to close the Program.cs file.

Add an EventLog Component

1.  With the Service1.cs file displayed in the design view, expand the Components node in the Toolbox and drag and drop an EventLog component onto the design surface. This will create an instance of the EventLog component named eventLog1.

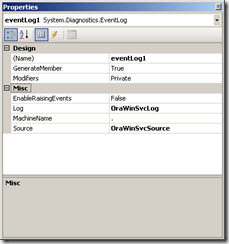
2.  If eventLog1 is not selected, left-click it to select. In the Properties window enter OraWinSvcLog for the Log property and enter OraWinSvcSource for the Source property. The Properties window should now look as follows:

OraWinService04

Define the Service Methods

1.  Right-click the Service1.cs file in the Solution Explorer and select View Code from the context menu to open the file in the editor.

2.  Add the following three lines to the end of the "list of using statements". A timer will be used to periodically trigger an event to write information to the Event Log. The other two lines are boilerplate inclusions for the ODP.NET namespaces.

using System.Timers;
using Oracle.DataAccess.Client;
using Oracle.DataAccess.Types;

3.  At the top of the class definition (but outside of any method definitions) add the following (be sure to adjust the Data Source in the connection string as appropriate for your environment). The user will be created later:

string constr = "User Id=/; Data Source=orademo; Enlist=false";
OracleConnection con = null;
Timer timer1 = null;

At this time the entire Service1.cs file should contain the following:

using System;
using System.Collections.Generic;
using System.ComponentModel;
using System.Data;
using System.Diagnostics;
using System.ServiceProcess;
using System.Text;
using System.Timers;

using Oracle.DataAccess.Client;
using Oracle.DataAccess.Types;

namespace OraWinService {
  public partial class OraWinSvcDemo : ServiceBase {
    string constr = "User Id=/; Data Source=orademo; Enlist=false";
    OracleConnection con = null;
    Timer timer1 = null;

    public OraWinSvcDemo() {
      InitializeComponent();
    }

    protected override void OnStart(string[] args) {
      // TODO: Add code here to start your service.
    }

    protected override void OnStop() {
      // TODO: Add code here to perform any tear-down necessary to stop your service.
    }
  }
}

4.  Change the constructor to the following to create the timer and set the handler function for the timer event:

public OraWinSvcDemo() {
  InitializeComponent();

  timer1 = new Timer();

  timer1.Elapsed += new ElapsedEventHandler(OnTimer);
}

5.  Add the OnTimer method below the constructor to handle the timer event:

private void OnTimer(object source, ElapsedEventArgs e) {
  if (con != null) {
    if (con.State == ConnectionState.Open) {
      OracleCommand cmd = con.CreateCommand();
      cmd.CommandText = "select user, sysdate from dual";
      OracleDataReader dr = cmd.ExecuteReader();
      while (dr.Read()) {
        eventLog1.WriteEntry(String.Format("User: {0}, Date: {1}", dr[0].ToString(), dr[1].ToString()));
      }

      dr.Dispose();
      cmd.Dispose();
      con.Close();
    }
  }
}

6.  Replace the generated OnStart method with the following which establishes a connection to the database and sets the timer properties (interval of 3 seconds and enables the timer):

protected override void OnStart(string[] args) {
  eventLog1.WriteEntry("In OnStart");

  con = new OracleConnection(constr);

  try {
    con.Open();
    eventLog1.WriteEntry("Successfully connected to Oracle!");
  }
  catch (OracleException ex) {
    eventLog1.WriteEntry("OracleException: " + ex.Message);
  }

  timer1.Interval = 3000;
  timer1.Enabled = true;
}

7.  Replace the generated OnStop method with the following code:

protected override void OnStop() {
  eventLog1.WriteEntry("In OnStop");

  timer1.Enabled = false;

  if (con != null) {
    con.Dispose();
  }
}

8.  Add a handler for the OnPause event for the service below the OnStop method:

protected override void OnPause() {
  eventLog1.WriteEntry("In OnPause.");

  timer1.Enabled = false;
}

9.  Add a handler for the OnContinue event for the service below the OnPause method:

protected override void OnContinue() {
  eventLog1.WriteEntry("In OnContinue.");

  timer1.Enabled = true;
}

10.  Add a handler for the shutdown event below the handler for the OnContinue event:

protected override void OnShutdown() {
  eventLog1.WriteEntry("In OnShutdown");

  timer1.Enabled = false;

  if (con != null) {
    con.Dispose();
  }
}

11.  Select File -> Save All from the main menu to save all work and File -> Close to close the Service1.cs file in the editor.

Create Installers for the Components

1.  Service1.cs should in the design view mode within the editor. If it is not, right-click it in the Solution Explorer and select View Designer from the context menu.

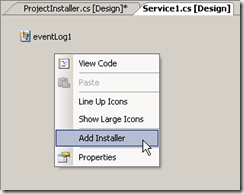
2.  Create an installer by right-clicking on the design surface and selecting Add Installer from the context menu:

OraWinService06

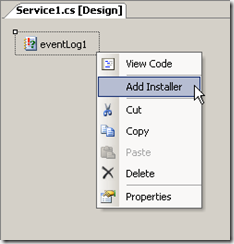
3.  After clicking Add Installer, ProjectInstaller.cs will be created and opened in the editor. Click the Service1.cs [Design] tab to switch back to Service1.cs in the editor. Add an installer for the eventLog1 component by right-clicking it and selecting Add Installer from the context menu:

OraWinService05

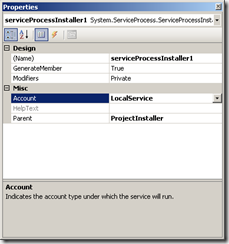
4.  After adding the eventLog1 installer, left-click the serviceProcessInstaller1 component to select it. Next select LocalService from the drop-down list:

OraWinService07 

5.  Select File -> Save All from the main menu to save all files.

6.  Select Build -> Build OraWinService from the main menu to build the project, then select File -> Close twice to close the ProjectInstaller.cs and Service1.cs files.

Create a Setup Project for the Service

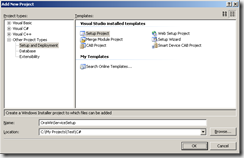
1.  Select File -> Add -> New Project... from the main menu, in the Project types pane expand the Other Project Types node, select Setup and Deployment, select Setup Project in the Templates list, enter OraWinServiceSetup for the Name, and select an appropriate location (or accept the default supplied value). The Add New Project dialog should look as follows:

OraWinService08

2.  Click OK to add the setup project to the solution.

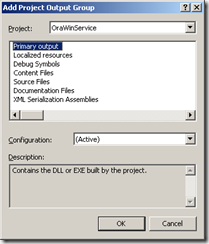
3.  In Solution Explorer, right-click OraWinServiceSetup then select Add -> Project Output... from the context menu. The Add Project Output Group dialog will be displayed:

OraWinService09

4.  Ensure Primary Output is selected and click OK.

5.  In Solution Explorer, right-click OraWinServiceSetup then select View -> Custom Actions from the context menu to open the custom actions in the editor.

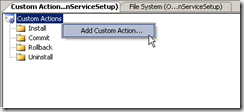
6.  In the Custom Action editor, right-click Custom Actions and select Add Custom Action... from the context menu:

OraWinService10

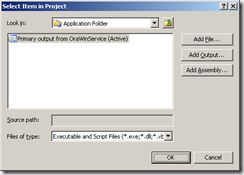
7.  In the Select Item in Project dialog, double-click the Application Folder item, then select Primary output from OraWinService (Active), and click OK to add the output to each of the Install, Commit, Rollback, and Uninstall nodes:

OraWinService11

8.  Select File -> Save All from the main menu and then File -> Close for each opened file in the editor.

9.  Build the setup program by right-clicking OraWinServiceSetup in Solution Explorer and selecting Build from the context menu:

OraWinService12

Install the Windows Service

1.  Using Windows Explorer navigate to the directory where the setup project was built. For example, on my system this is in C:\My Projects\Test\C#\OraWinServiceSetup\Debug directory.

2.  Install the service by right-clicking the OraWinServiceSetup.msi file and selecting Install from the context menu. Step through the installation wizard to complete the installation.

Create the Database User

1.  Connect to the database that the service will use as a DBA user and determine the value of the os_authent_prefix parameter:

SQL> show parameter os_authent_prefix

NAME              TYPE        VALUE
----------------- ----------- -----
os_authent_prefix string

2. As you can see here I do not have a value for this parameter; therefore, when I create the user I do not use a prefix:

SQL> create user "NT AUTHORITY\LOCAL SERVICE" identified externally;

User created.

SQL> grant create session to "NT AUTHORITY\LOCAL SERVICE";

Grant succeeded.

3.  For more information on creating an Operating System authenticated user, see my earlier post on Configuring Windows Authentication.

Running the Service and Viewing Results

1.  Open the Services management console by clicking Start -> Administrative Tools -> Services. You can also right-click the My Computer icon on the desktop and select Manage from the context menu.

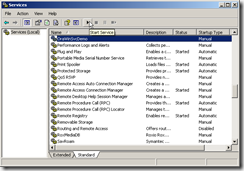
2.  Locate the OraWinSvcDemo service in the list of services and click the start button:

OraWinService13

3.  Open the Event Viewer by clicking Start -> Administrative Tools -> Event viewer. Or right-click the My Computer icon on the desktop and select Manage from the context menu (if you have not already done so).

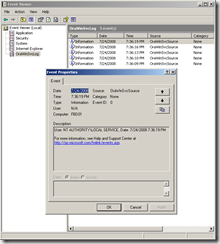
4.  In the Event Viewer, select OraWinSvcLog by left-clicking it. As the service writes entries to the log every 3 seconds while it is executing, you should see several entries after a 10 seconds or so:

OraWinService14

5.  Experiment with the different service states (paused, resume, restart, etc) and verify the entries in the Event Viewer.

Saturday, June 28, 2008

Oracle OpenWorld 2008 San Francisco

It's hard to believe, but Oracle OpenWorld 2008 in San Francisco is coming round fast! I will be attending this year and here's my Oracle Mix profile link (free account required):

oow_mix_2008

I've been really busy with the day job though I plan to have some more technical content in the near future! I've a couple of ideas swimming around that may be interesting as they're based on real questions.